Here is useful, practical content regarding the installation of the (a professional hair processing machine / dryer).
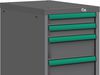
Unscrew the extension locking screw from the pedestal tube. Warning: The internal spring may cause the tube to extend slowly; ensure no people or objects are directly in front of it.
| | Likely Cause(s) | Troubleshooting Steps | | :--- | :--- | :--- | | Unit powers on, then quickly shuts off with a beeping sound. | System error; a faulty temperature sensor or control board component may be triggering a fail-safe. | This is often a complex internal error. Check the wiring for the temperature sensor; if not resolved, professional repair is needed. | | Display is visible but appears very dim or "dark." | Failed backlight or a contrast control issue (e.g., a small potentiometer on the board). | Examine the electronic board near the display for a tiny potentiometer that may have drifted. If none exists, the backlight has likely failed. | | The unit initiates a program, but no heat is generated. | Blown fuse/tripped breaker or a faulty heating element. | First, verify your dedicated circuit breaker hasn't tripped. If not, the internal heating elements may have failed. | | The control panel is blank when powered on. | No power to the unit or a failed control board. | Verify the outlet has power using a voltage tester. If the outlet works, the unit likely has an internal electrical failure. | wella climazon millenium manual install
Guide the wiring harness through the arm pivot if internal, and insert the head connection pin into the end of the arm. Lock the safety ring or screw to prevent accidental detaching. 4. Electrical Connection & Cable Routing
This guide provides a comprehensive overview of the manual installation process for both the pedestal and wall-mounted versions of the Climazon. 1. Pre-Installation: Choosing Your Configuration
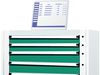
Insert the extension arm into the wall bracket. Attach the spring arm (Acrobat) to the extension arm. Caution: The spring arm is under high tension and should only be released once the weight of the Climazon head is attached. | | Likely Cause(s) | Troubleshooting Steps |
This guide outlines the manual installation process for the two primary configurations: the version and the Wall-Mounted version. 1. Safety and Pre-Installation Requirements Before beginning, ensure you have a suitable environment.
, including wall mount setups and pedestal configurations, based on standard salon equipment procedures. 1. Safety First: Pre-Installation Preparation
Ensure all protection caps ( d , e , f , g in the official manual) are installed to prevent electric shocks.
Insert the heavy pivot pin of the arm into the sleeve of the wall bracket.
Add product to list
Add product to label list
An error occurred
Sorry! An error has occurred, please try again later.